How to Attach a Headboard to a Bed Frame: Fit, Brackets & Steps
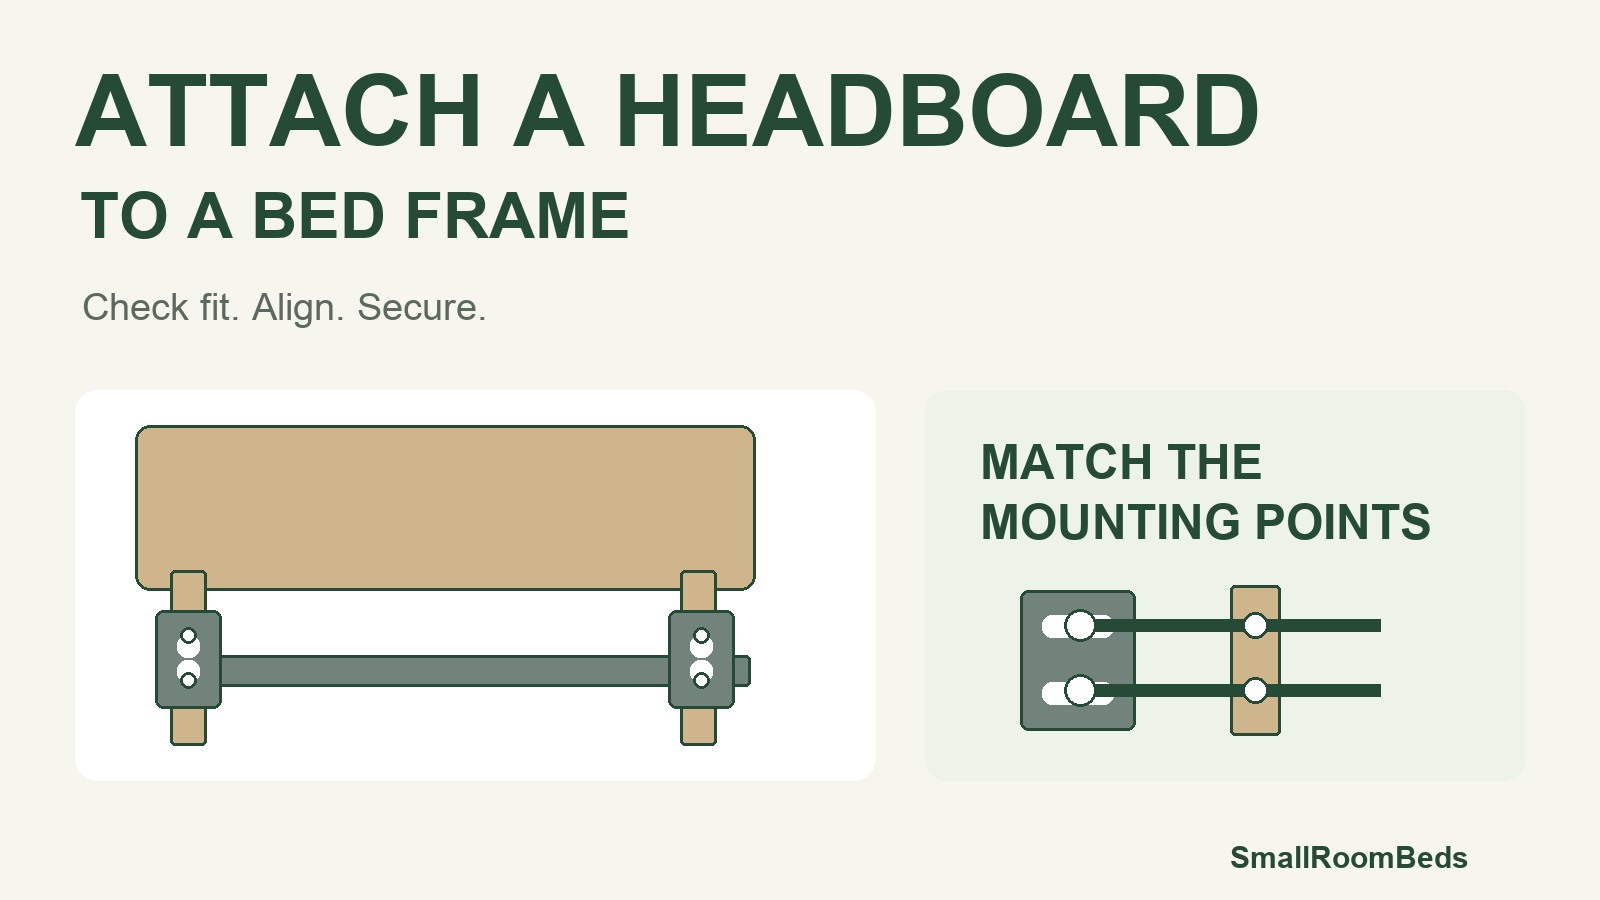
Adding a headboard can finish the look of a bed, give pillows a backstop, and make the room feel more settled. The part that takes some thought is the connection: a headboard and frame can share the same mattress size while their mounting points sit in different places.
When we work out how to attach a headboard to a bed frame, we check three things first: the attachment type, the position of the mounting holes, and the hardware specified for that connection. Once those match, a straightforward bolt-on installation follows the six steps below.
The quick answer: for a compatible bolt-on setup, align the headboard legs with the frame’s mounting brackets, start the specified bolts loosely on both sides, level the headboard, and tighten the connections as directed. If the holes do not meet, identify the mismatch before choosing an adapter.
In this guide
Find Your Attachment Type First
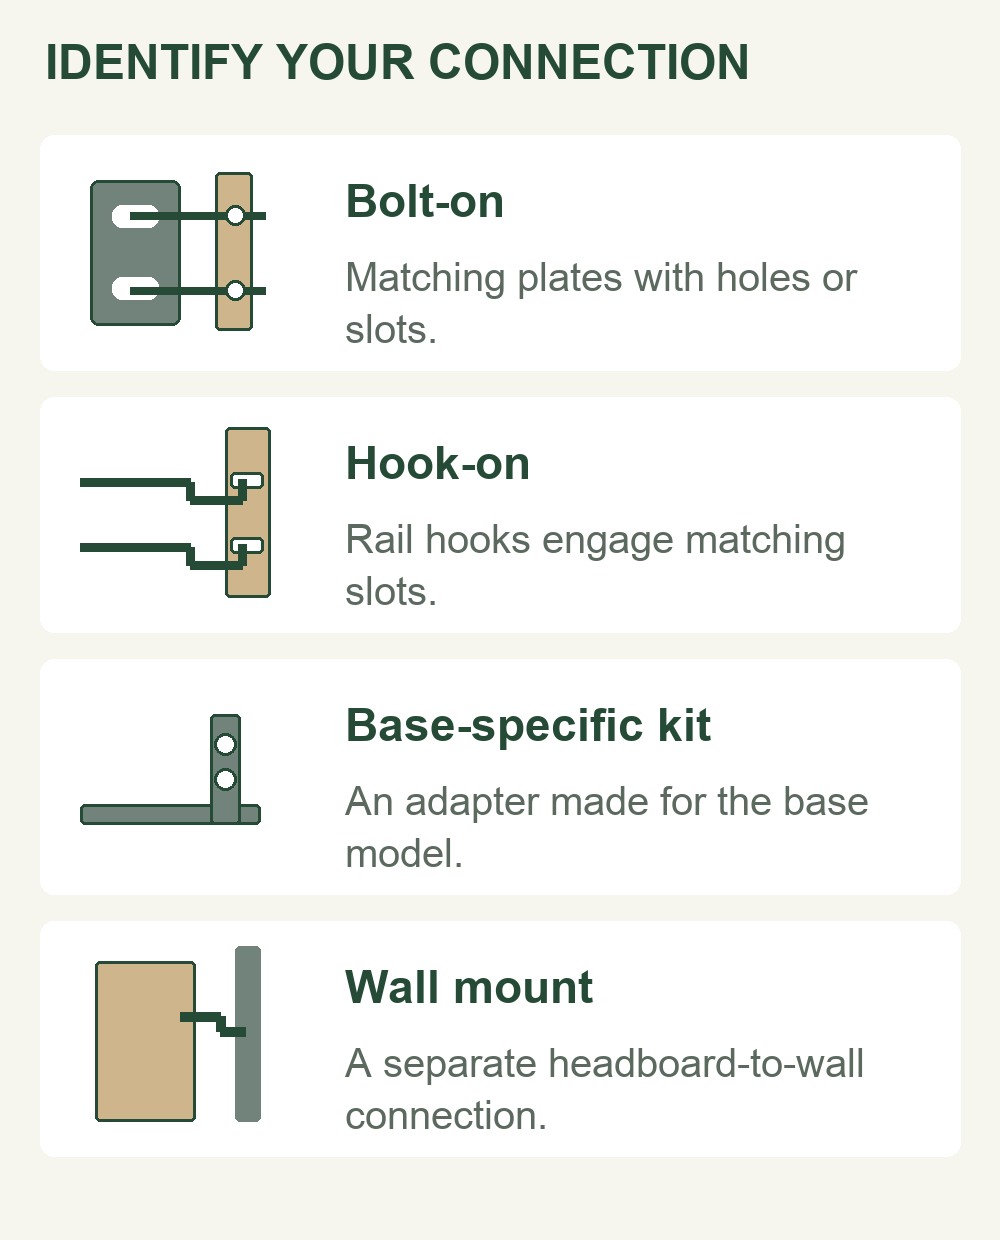
Look at the head end of the bed frame and the back of both headboard legs. A slotted plate, a pair of hooks, and a threaded insert each need a different connection. Our bed parts guide can help you identify the rails, legs, and brackets you are looking at.
| What you see | Likely method | What to confirm |
|---|---|---|
| Holes or slots in matching mounting plates | Bolt-on connection | Hole positions, fastener specification, and whether the joint uses a nut or threaded insert |
| Hooks on the rail ends and corresponding slots in the headboard | Hook-on connection | Hook shape, spacing, engagement, and any required locking hardware |
| A designated attachment point on an adjustable base | Model-specific bracket kit | Exact base model, generation, kit, and headboard connection |
| No intended frame attachment | Check for an approved add-on or a wall-mounted alternative | The frame maker’s attachment options and the headboard’s installation instructions |
Swipe sideways to read every column.
A headboard supplied as part of a complete bed may also brace the rails or support a center beam. Replacing that piece involves the bed’s structure. Treat an integrated headboard differently from a decorative panel added to a complete, freestanding frame.
Measure the Mounting Points Before You Start
“Queen” tells you the nominal mattress size, but it does not tell you the spacing between attachment points. We would measure the connection directly, especially when combining furniture from different brands or reusing an older headboard.
| Measurement | How to take it | Why it matters |
|---|---|---|
| Left-to-right mounting distance | Measure center to center between the intended attachment points | Shows whether the headboard legs reach the frame brackets |
| Hole spacing on each side | Measure between the centers of the holes or compare their usable slots | Shows whether the specified fasteners can engage at the same time |
| Mounting height | Measure from the floor to the relevant hole centers with the frame level | Reveals vertical mismatch and the available height adjustment |
| Fastener and joint dimensions | Check the specified thread, bolt length, and thickness of the joined pieces | Distinguishes a through-bolt joint from a threaded insert |
| Working and operating space | Check access behind the legs, the baseboard, and any moving base sections | Confirms that tools fit and the completed setup has clearance |
Swipe sideways to compare the measurements.
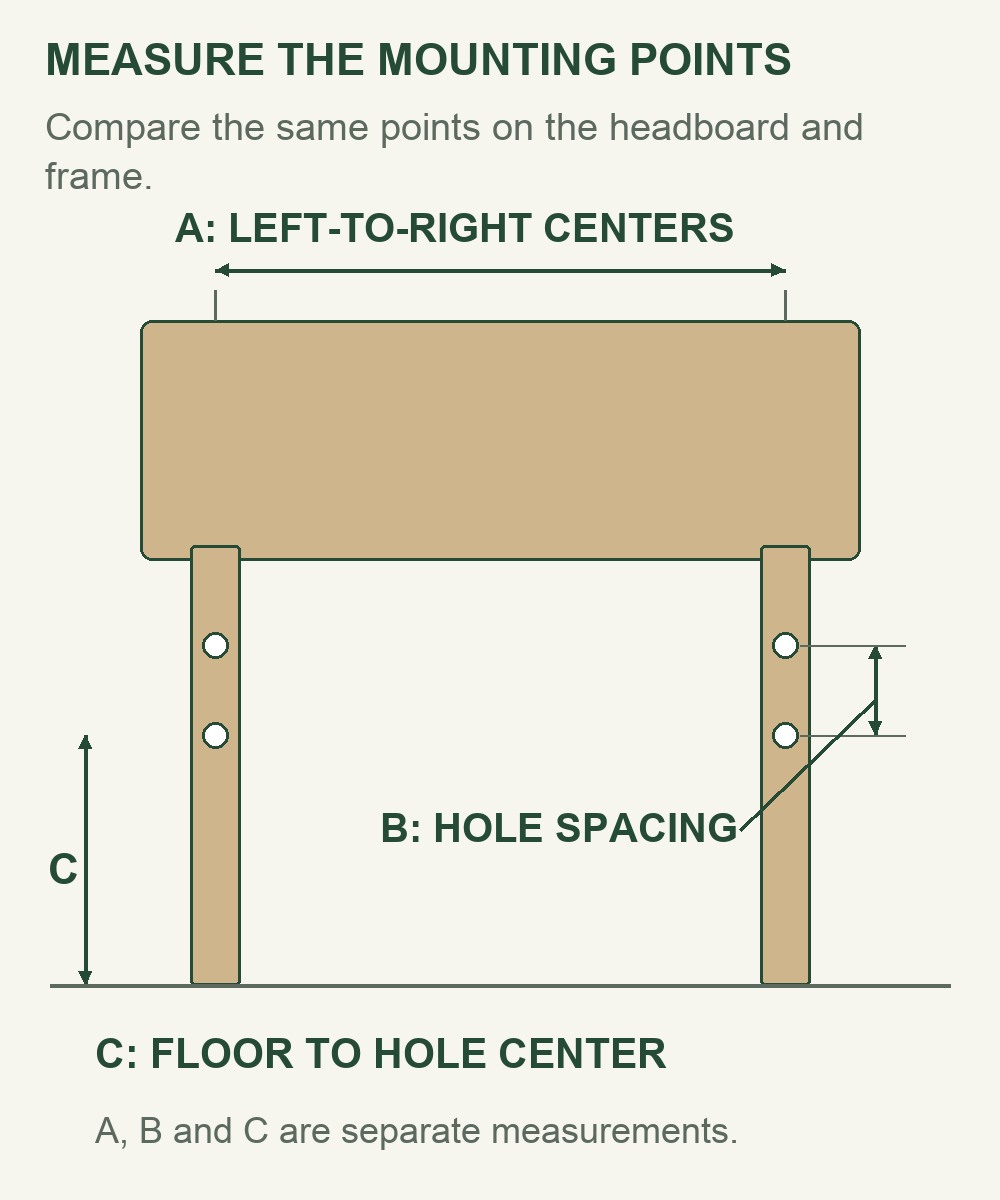
For slotted brackets, compare the positions the fasteners can actually use. The outside dimensions of a plate do not describe its adjustment range. A slot may help with one direction of mismatch while leaving the other unchanged.
Also check the mattress relationship. Decide how much of the headboard should remain visible, then confirm that the required mounting positions allow it. Our bed height calculator can help compare mattress-top heights; take the mounting-hole measurements separately.
Gather the Right Tools and Hardware
Set out the product instructions, tape measure, level, and the wrench, socket, screwdriver, or hex key that fits the supplied fasteners. A second person can hold the headboard upright while you align the parts.
Before ordering replacement hardware, check the packaging and the headboard’s rear compartment. Lucid explains that some of its headboards store the hardware and legs behind a zippered or hook-and-loop back panel.
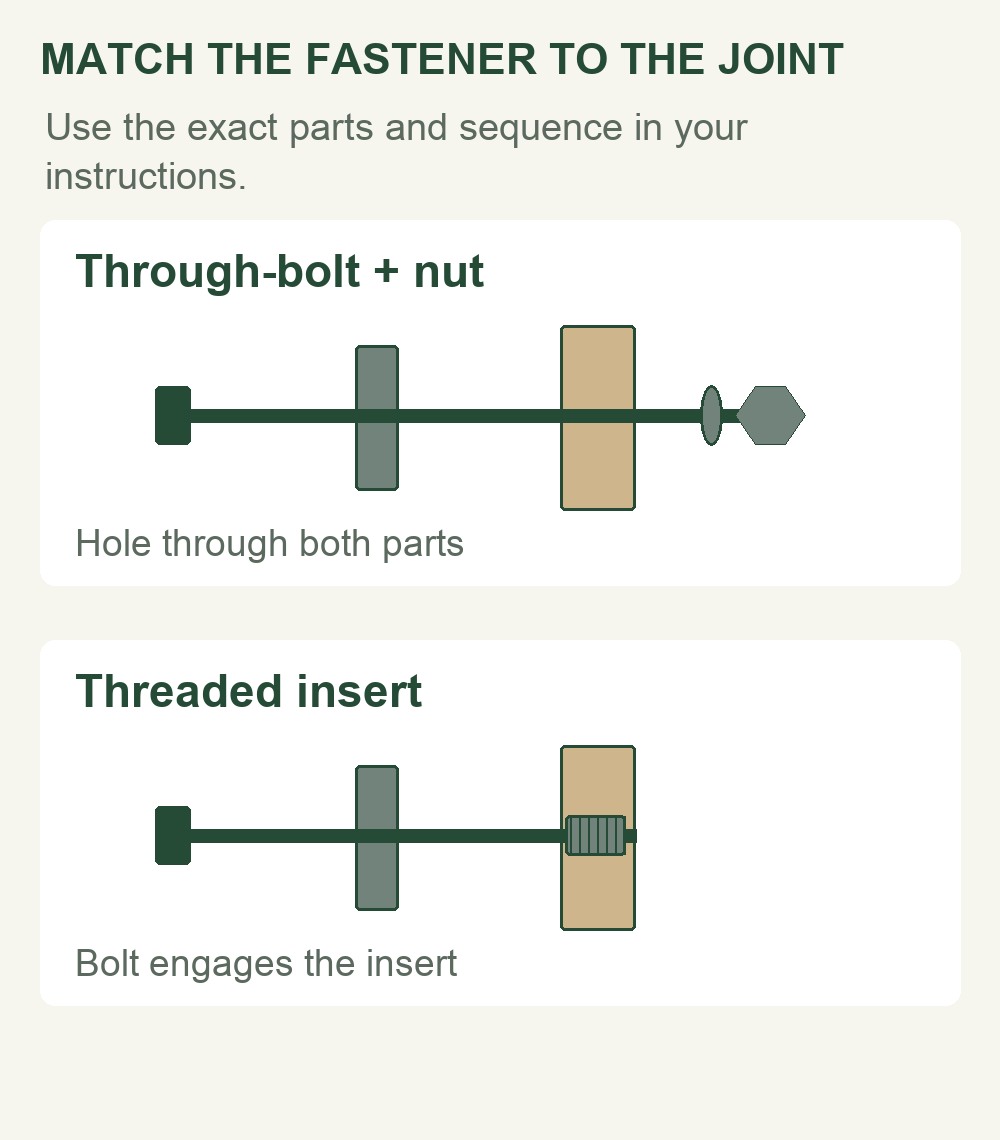
Use the specified fastener for each joint. Leg-to-headboard bolts may differ from frame-to-headboard bolts. A bolt that passes through two holes and takes a nut is also different from one that threads into an insert. Match the diameter, thread pitch, and length; do not force a bolt that resists hand-starting.
How to Attach a Headboard to a Bed Frame in 6 Steps
These steps cover a compatible bolt-on headboard and frame. For hook-on rails or an adjustable-base kit, use the corresponding instructions and the frame-specific notes below.
1. Clear access to the mounting points
Move the bed far enough from the wall to reach both rear corners and work the tools. Remove the mattress or support unit if the instructions require it for access. Protect the floor and keep the frame level on its supports.
Find the intended headboard mounting points at the head end. Do not confuse them with the slats that carry the mattress. If you are reassembling a moved bed, our bed frame disassembly guide explains how labeled hardware and connection photos help keep the correct parts together.
2. Assemble the headboard legs
Lay the headboard on a protected surface as directed and attach its legs with their designated hardware. Choose a permitted leg position that will align with the frame and suit the finished bed height. Keep the front of the headboard facing the mattress.
If its height adjustment uses several hole positions, use a matching setting on both sides. Follow the instructions for how many fasteners each leg requires; an unused adjustment hole does not necessarily indicate a missing bolt.
3. Align both sides before fastening
With a helper holding the headboard, bring its mounting points alongside the frame brackets. Check both sides together, including the clearance behind the mattress and against the baseboard. A good connection should meet without pulling the frame sideways or bending a plate.
If only one side lines up, recheck the measurements and orientation. This is the point to identify a mismatched interface or choose an appropriate adapter, rather than tightening the first side and trying to drag the second into position.
4. Start the correct fasteners loosely
Install the bolts and washers in the order shown by the manufacturer. In a through-bolt arrangement, add the matching nut on the opposite side. With a threaded insert, start the specified bolt directly into the insert instead.
Start the required fasteners on both sides by hand before final tightening. Leave only the adjustment needed to align the assembly; make sure the threads engage correctly and each specified connection is present.
5. Level the headboard and tighten
Check the headboard across the top with a level and confirm the leg settings. Make small adjustments within the allowed slots, then tighten the connections with the correct tool and any manufacturer-specified torque.
Work across both sides so the headboard stays aligned. We would not apply a universal extra turn or torque figure: the correct tightening depends on the bolt, insert, bracket, and materials in that joint.
6. Check the completed setup
Return the support unit and mattress if removed, then move the bed into its final position without dragging the headboard by its panel. Confirm that both mounting sides remain secure, the headboard is level, and no projecting hardware contacts the mattress.
Check for movement at the connection and for contact with the wall. Follow the product’s instructions for rechecking hardware over time. If the frame itself rocks or moves, resolve that separately from the headboard connection.
Metal Frames, Platform Beds and Adjustable Bases
Metal frames with bolt-on plates or hook-on rails
A metal frame with suitable end plates may accept a bolt-on headboard directly. Confirm its holes against the headboard legs and use the specified fasteners. With hook-on rails, match the hooks to the receiving slots and follow the seating and locking directions. A flat modification plate does not itself convert a bolt-on connection to hook-on.
Wooden and upholstered platform beds
Look for designated brackets, threaded inserts, or an attachment kit made for the platform. Upholstery may conceal marked access points, so use the assembly diagram to locate them. A wooden frame does not automatically have a suitable place to drill, and mattress slats are not a substitute for the intended headboard mounting points.
If the existing headboard is part of the rail or center-support assembly, check the complete bed instructions before replacing it. The new panel must not leave that structural connection unfinished.
Adjustable bases
Identify the exact base model and generation before choosing its bracket kit. Lucid’s manual library, for example, separates current and previous models and uses the remote style to help identify the base.
Install the kit at its designated attachment points, with the base positioned and disconnected from power as its instructions direct. After assembly, clear people and objects from the mechanism, reconnect power, and check the full range of motion for interference.
A decorative bed frame surrounding a base is a separate piece. Our bed frames for adjustable bases guide explains that fit. Decide whether the headboard belongs to that surrounding frame or connects to the base itself before buying hardware.
What to Do If the Holes Do Not Line Up
Separate position problems from connection-type problems. Changing height may solve a vertical mismatch; it cannot change a hook-on fitting into a bolt-on joint.
| Problem | Check first | Possible next step |
|---|---|---|
| Headboard legs sit wider or narrower than the frame brackets | Mounting center distance, orientation, and permitted adjustment | A compatible modification plate where its usable holes and slots cover the mismatch |
| Holes meet horizontally but miss vertically | Headboard leg settings, floor level, and slot positions | Adjust within the intended mounting positions; otherwise check a specified adapter |
| The frame has no headboard holes | Whether the maker offers an add-on bracket for that frame | Use an approved kit, or consider a headboard designed for wall mounting |
| Bolts are missing or will not engage | Back compartment, part number, thread, and joint type | Obtain the correct replacement hardware rather than forcing a near match |
| The headboard moves after installation | Every specified connection, level, bracket fit, and frame movement | Correct the connection; a wall bumper does not replace missing mounting hardware |
Swipe sideways to see the checks and next steps.
For a frame without an intended attachment, we would check the manufacturer’s options before modifying it. A clamp needs an approved rail shape and clamping location; a label saying “universal” does not establish that fit.
A wall-mounted headboard can provide an alternative when the headboard and mounting system allow it. Match the mounting blocks, hangers, wall construction, and fixings to that installation. Use the headboard’s specified attachment locations rather than assuming any point on its back can carry a hanger. A freestanding option should likewise be designed for that use.
When an Adapter Plate or Bracket Kit Helps
These two examples solve different connection needs. Compare the exact mounting geometry and instructions before selecting either one; neither is a replacement for a compatible frame attachment.
KB Designs Modification Modi-Plates, Set of 2
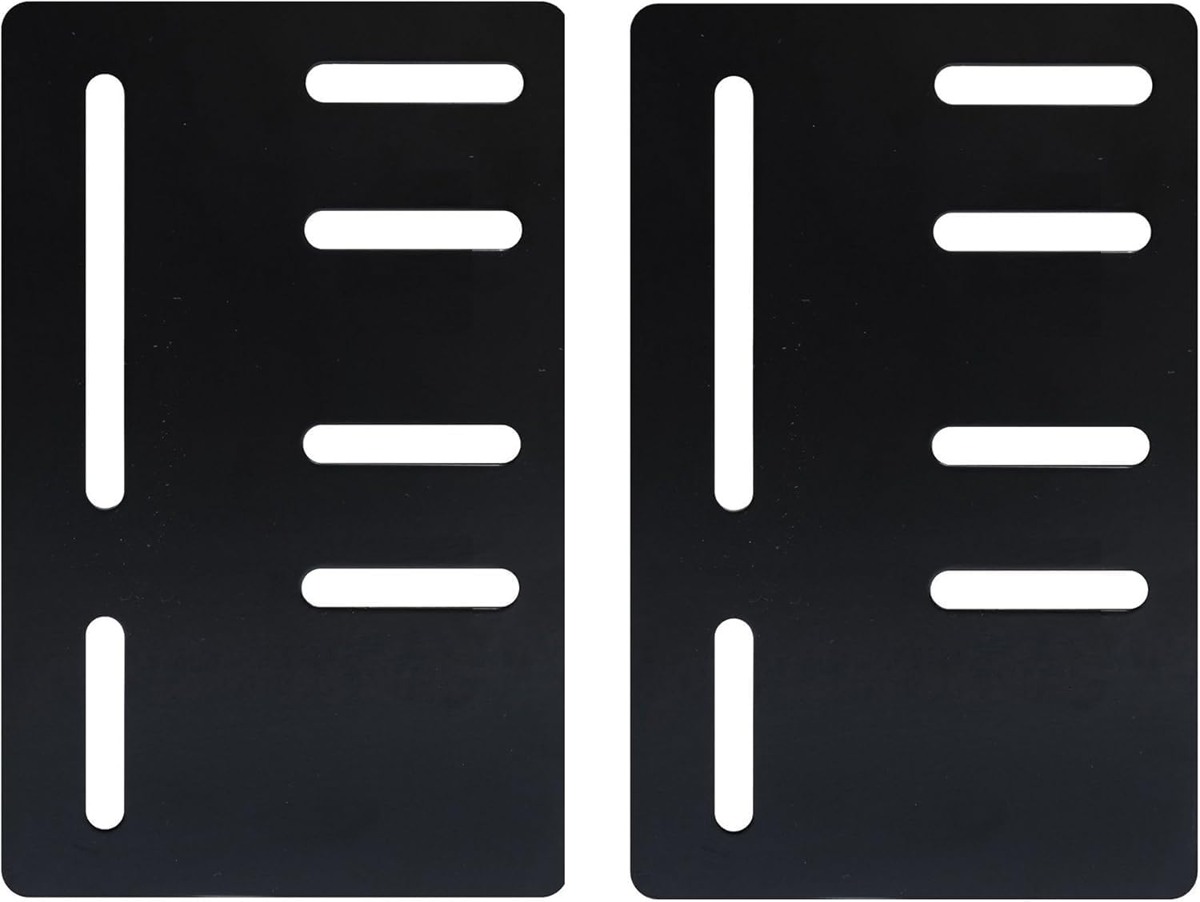
This pair of black metal plates is intended to connect standard bolt-on brackets to an unusually sized headboard. Each plate is listed as 4 inches wide by 6 inches high. We would compare its slot pattern with the measured mounting points; the plate’s outside size does not establish the offset it can accommodate. Confirm the fasteners required for both connections.
Pros
- Provides additional mounting positions.
- Pair supplies one plate for each side.
Cons
- Slot pattern must match the actual mismatch.
- Needs suitable bolt-on connections underneath.
Who should skip this: readers needing hook-on conversion, a dedicated adjustable-base kit, or a solution for a frame with no intended mounting structure.
View the modification platesLucid L150/L300 Headboard Brackets
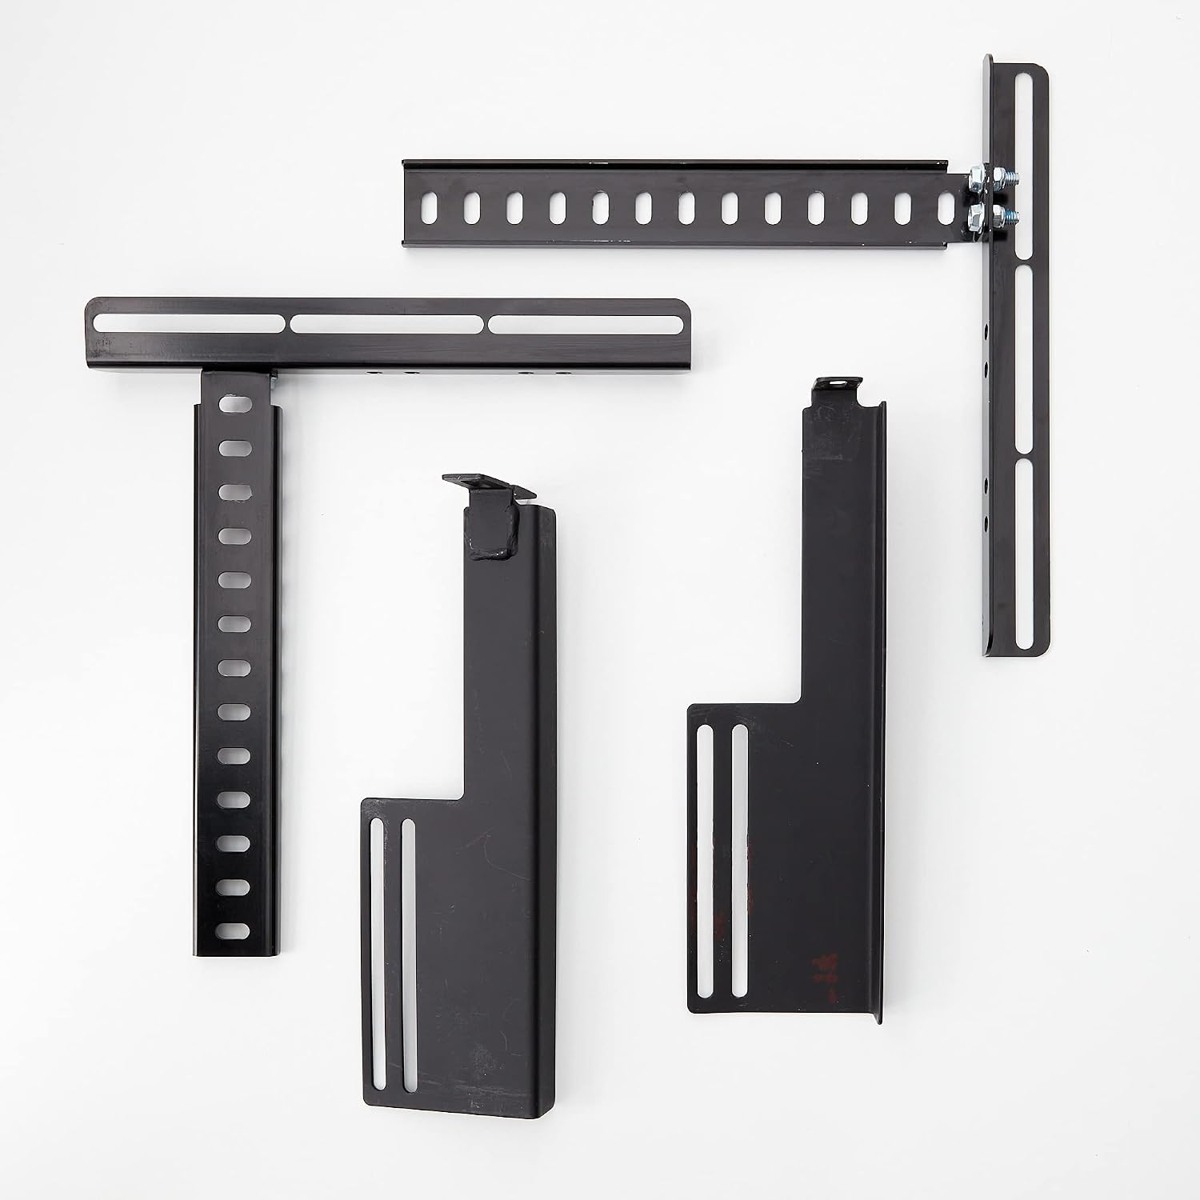
This steel kit is listed for Lucid L150/L300 bases and includes hardware, with a wrench supplied separately. Its adjustable connection illustrates how a dedicated base kit differs from a flat plate. Match the base’s model and generation to the kit before ordering; the headboard’s width alone cannot confirm compatibility.
Pros
- Names the intended base models.
- Includes mounting hardware.
Cons
- Requires model and generation confirmation.
- Wrench is not included.
Who should skip this: owners of an L600 or another base without explicit kit compatibility, and readers who only need a flat bolt-on position adapter.
View the L150/L300 bracket kitHeadboard Attachment FAQs
Can you attach a headboard to any bed frame?
Direct attachment requires compatible mounting points and hardware. Some frames offer a specific add-on kit; others suit a separately wall-mounted headboard. Check the complete connection rather than relying on matching mattress-size labels.
Can you attach a headboard without drilling?
Yes, when suitable existing holes, hook-on fittings, threaded inserts, or an approved add-on provide the connection. Those options still require the correct hardware. If the frame offers no attachment method, compare a headboard designed for a different installation.
What size bolts attach a headboard to a bed frame?
Use the size specified for the exact joint. Diameter, thread pitch, and length all matter, and the headboard’s leg assembly may use different bolts from its frame connection. Request replacements by part number or confirmed specification.
Will a Full headboard fit a Queen frame?
Only if the headboard, frame, and any adapter permit the resulting connection. Compare the mounting centers and adjustment range. An adapter does not change the support requirements or mattress size of the bed frame.
Does an adjustable base need a special headboard?
It needs an approved attachment arrangement. A suitable conventional headboard may connect through the base’s designated kit. Check the base model, kit, headboard mounting points, and clearance through the full range of motion.
Choose the Connection That Matches Your Bed
We would start with the interface, measure the mounting points, and gather the specified hardware before moving into the six installation steps. When something does not line up, identify that mismatch first. A correctly chosen adapter or base kit should solve a defined connection problem and leave both sides secure and level.